
add section editor is what this guide covers, with the exact checks and fixes journals hit in production. More OJS help: Open Journal Systems guides.
add section editor
You Need Help Managing Your Journal. But How Do You Add Editors and Reviewers to OJS?
Direct answer: Add section editors and reviewers under Users & Roles → Users → Create User. Give a unique username, real name, and monitored email; assign Section Editor with the right section(s) or Reviewer with Can Review and expertise keywords; save, send login details, and verify invitation email works before you rely on them in production.
Your journal is growing. You can no longer handle all editorial decisions alone. You need to bring on section editors to manage specific topic areas. You need to build a reviewer database so you have qualified peers available for each submission.
But OJS user management is not intuitive. Roles are hierarchical and permissions-based. Add someone with the wrong role and they either see everything they should not, or cannot access the tools they need. Create reviewer accounts incorrectly and they cannot accept review invitations.
Understanding OJS's user roles and how to properly assign them is essential for building a functional editorial team.
This guide walks you through creating accounts, assigning roles, and configuring permissions for section editors, reviewers, and other editorial team members, written by OJS specialists who manage editorial teams for journals across 20+ countries.
If you want an expert to set up your OJS editorial team structure, visit ojsguru.com for a free consultation.
Understanding OJS User Roles
OJS organizes access and permissions through user roles. Understanding the role hierarchy is essential before adding team members.
OJS User Roles (from highest to lowest privilege):
Site Administrator
- Full access to all journal settings
- Can create and delete journals
- Can manage all system-level configurations
- Usually only the hosting provider or IT administrator
Journal Manager
- Full access to journal settings
- Can create user accounts and assign roles
- Can configure all aspects of the journal
- Usually the journal owner or senior editor
Editor-in-Chief
- Can make final editorial decisions
- Can access all submissions
- Can view all editorial reports
- Cannot change journal settings (that is Journal Manager's role)
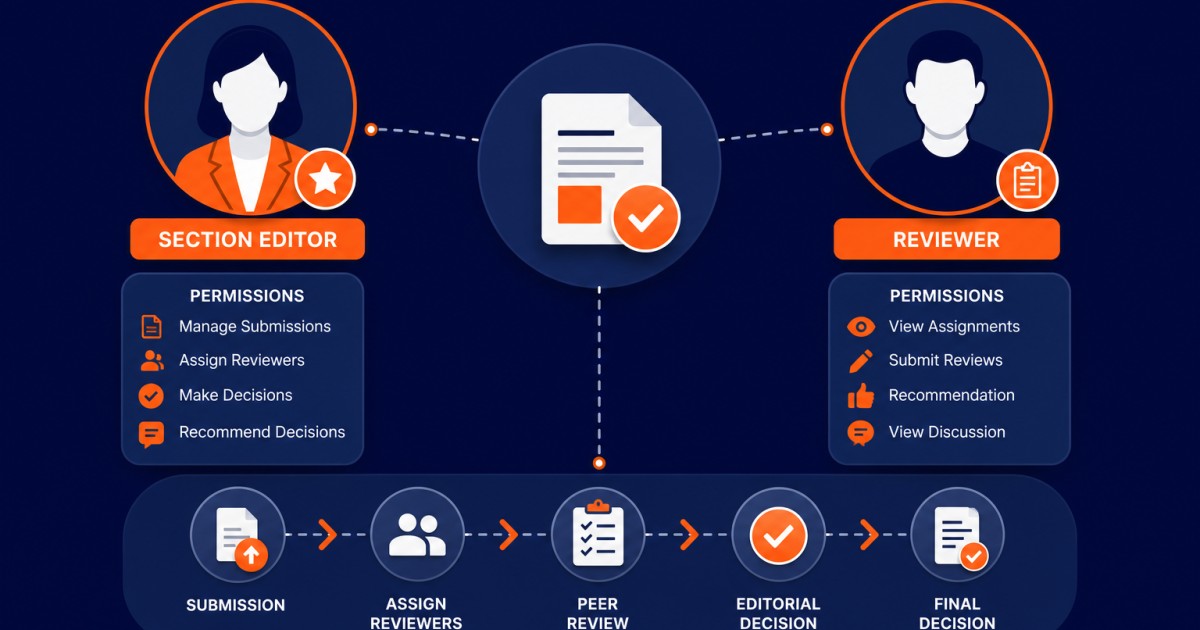
Section Editor
- Manages specific journal sections (e.g., Research Articles, Reviews)
- Can assign reviewers to submissions in their section
- Can communicate with reviewers
- Can make editorial recommendations
- Can only see submissions assigned to their section
Reviewer
- Can view assigned submissions
- Can submit reviews using the review form
- Cannot see other reviewers' reviews (in double-blind mode)
- Cannot access submissions they are not assigned to
Author
- Can submit articles
- Can view status of their own submissions
- Can see reviewer comments (with names hidden in double-blind)
- Cannot access other authors' submissions
Reader
- Can read published articles
- Usually public (anyone visiting the journal)
- No login required
How to Add Editors and Reviewers in OJS (Setup Path)
Use this path for every new teammate. Role hierarchy, form fields, welcome templates, and common permission mistakes follow below.
- Open Users & Roles → Users as Journal Manager (or role that can manage users).
- Create User with unique username, real name, monitored email, and temporary password.
- For editors: assign Section Editor plus the correct section(s) and expertise notes.
- For reviewers: assign Reviewer, enable Can Review, add precise keywords, note review capacity.
- Save, then verify the account appears in the user list and role badges look correct.
- Send a welcome message with journal URL, username, temp password, and role responsibilities.
- Test that invitations and notifications reach the new email (SMTP must be working).
- For existing people, edit the user to add/remove roles or change section assignments.
- When someone leaves, remove roles or deactivate rather than delete, after reassigning open work.
- Track active vs silent teammates and keep keywords updated for match quality.
Step 1: Access User Management
Go to Users & Roles → Users
You will see a list of all existing users in your journal.
This is where you create new accounts and manage existing ones.
Step 2: Create a New User Account
Click Create User
A form appears with fields to complete:
Username (required)
- Unique identifier for login
- Use lowercase letters and numbers (no spaces)
- Example: jsmith or j.smith
- This cannot be changed later
First Name (required)
- User's given name
Last Name (required)
- User's surname
Email (required)
- Active email address where they will receive notifications
- OJS will use this to send review invitations, submissions, etc.
- Must be a real, monitored email
Password (required)
- Set a temporary password
- User should change it after first login
- Make it at least 8 characters with letters and numbers
Affiliation (optional)
- User's institutional affiliation
- Appears on published articles if they are an author/editor
Country (optional)
- User's country of residence
Roles (critical)
- Select which role(s) this user will have
- See Step 3 below for role-specific guidance
User Profile Information (optional)
- Biography
- Interests/expertise areas
- Reviewer keywords (for matching with submissions)
Click Save to create the account.
Step 3: Assign a Section Editor Role
If you are adding a new section editor:
In the user creation form, look for Roles
Check the box next to Section Editor
Additional fields appear:
Assigned Sections
- Select which journal sections this editor will manage
- If your journal has multiple sections (Research Articles, Reviews, Case Studies), assign the relevant ones
- An editor can manage multiple sections
Editorial Interests
- Enter keywords describing their expertise
- These help match them with appropriate submissions
- Example: "machine learning, natural language processing, neural networks"
Can Review (checkbox)
- Check this if the section editor can also accept review assignments
- Most section editors do both
Click Save
The user now has section editor access and will appear in your reviewer selection list for their assigned sections.
Step 4: Assign a Reviewer Role
If you are adding a new reviewer:
In the user creation form, look for Roles
Check the box next to Reviewer
Additional fields appear:
Can Review (checkbox)
- Always check this for reviewers
- Without it, they cannot accept review invitations
Reviewer Keywords/Interests
- Enter keywords describing their research expertise
- Be specific: "cardiac surgery, minimally invasive procedures, robotic surgery"
- These keywords help you quickly find qualified reviewers for submissions
Maximum Number of Reviews
- How many concurrent reviews can this reviewer handle?
- Typical: 2-3 concurrent reviews
- Experienced reviewers: up to 5
- This is for your reference only, OJS does not automatically enforce this limit
Click Save
The reviewer is now in your system and can be invited to review submissions.
Step 5: Edit Existing User Roles and Permissions
Need to change a user's role or permissions?
Go to Users & Roles → Users
Find the user in the list
Click their username to edit
You can:
- Change their password (if they forgot it)
- Update their email address
- Add or remove roles
- Change assigned sections (for section editors)
- Update their reviewer keywords
Click Save after making changes.
Step 6: Set User Access Permissions (Advanced)
For more granular control, configure what each user can do.
Go to Users & Roles → Site Roles and Permissions (if available in your OJS version)
This allows you to customize exactly what each role can see and do. For example:
- A section editor can only edit submissions in their section
- A reviewer cannot see the names of other reviewers
- An author can only see their own submissions
Most journals use the default role permissions, which are appropriate for standard workflows.
Only customize if you have specific requirements.
Step 7: Communicate with New Team Members
After creating accounts, send new editors and reviewers information about their roles.
Send a welcome email including:
For Section Editors:
Welcome to [Journal Name]!

You have been added as a Section Editor for [Section Name].

Your responsibilities:
- Manage submissions in your assigned section
- Assign peer reviewers to submissions
- Track review progress and deadlines
- Make editorial recommendations
- Communicate with authors and reviewers

To log in:
- Go to [journal URL]
- Username: [username]
- Password: [temporary password,  change on first login]

Questions? Contact: [Editor-in-Chief Email]
For Reviewers:
Welcome to [Journal Name]'s Reviewer Network!

You have been added to our reviewer database. When we have
a submission in your area of expertise, we will invite you
to review.

Your role:
- Review assigned submissions using our structured review form
- Provide constructive feedback to authors
- Make a clear recommendation (Accept/Revisions/Reject)
- Keep your review confidential

To log in:
- Go to [journal URL]
- Username: [username]
- Password: [temporary password,  change on first login]

We value your expertise and look forward to working with you.

Best regards,
[Editor-in-Chief Name]
Step 8: Monitor and Manage Your Editorial Team
Keep track of your editors and reviewers.
Maintain a simple spreadsheet:
| Name | Role | Section | Status | Notes |
|---|---|---|---|---|
| John Smith | Section Editor | Research Articles | Active | Can handle 2-3 submissions/year |
| Jane Doe | Reviewer | Active | Completed 5 reviews | Reliable, quick turnaround |
| Ahmed Hassan | Section Editor | Reviews | Active | New to journal, learning role |
Review periodically:
- Who is active? Who has gone silent?
- Who is overloaded? Who has capacity?
- Are there expertise gaps you need to fill?
Step 9: Remove or Suspend User Access
If a section editor or reviewer needs to step down:
Go to Users & Roles → Users
Find the user and click their username
Option 1, Remove the role: Uncheck their role (e.g., uncheck "Section Editor") but keep their account active. They can no longer edit but their historical contributions remain.
Option 2, Suspend the account: Set their status to "Inactive" or delete the account entirely. Their access is completely disabled.
Most journals prefer to keep user accounts inactive rather than deleting them, preserving the history.
Best Practices for Building Your Editorial Team
Start with proven editors
Your section editors should have published in peer-reviewed journals, ideally edited a journal section before, and demonstrate strong editorial judgment.
Onboard new editors systematically
Do not just hand them access. Provide:
- A written editorial policy document
- Training on your specific journal's standards
- Examples of good editorial decisions
- Regular feedback early in their tenure
Build a diverse reviewer pool
Aim for:
- Geographic diversity (reviewers from multiple countries)
- Career stage diversity (mix of junior and senior researchers)
- Gender balance (if demographic data available)
- Topic coverage (reviewers in all areas your journal publishes)
Compensate when possible
While peer review is traditionally unpaid, consider:
- Waiving article processing fees for active reviewers
- Providing annual recognition or certificates
- Offering honorarium for high-volume reviewers
- Publishing an annual "Reviewers" list
Maintain transparent communication
- Tell editors when their section has new submissions
- Tell reviewers their reviews were valued (even if the article was rejected)
- Provide feedback on editorial decisions
- Thank them for their time
Common User Management Mistakes
Mistake 1: Adding someone as both Editor-in-Chief and Section Editor
Redundant roles create confusion about who is responsible.
Fix:
- Use Editor-in-Chief for the top-level decision maker
- Use Section Editor for those managing specific sections
- Keep roles distinct
Mistake 2: Not filling in reviewer keywords
You have reviewers but cannot find them when you need them.
Fix:
- Always complete the "Reviewer Keywords" field
- Be specific and comprehensive
- Update keywords annually as expertise evolves
Mistake 3: Setting wrong permissions for a role
A reviewer can see other reviewers' reviews (breaking double-blind). A section editor cannot access submissions. Permissions are confused.
Fix:
- Review default role permissions when setting up
- Test with a sample user to confirm they can only see what they should
- Document your permission settings
Mistake 4: Creating a new account but forgetting to verify email
The new editor never receives notifications because their email address is wrong or unmonitored.
Fix:
- Always verify new team members provide correct email addresses
- Send a test email after creating the account
- Ask them to confirm they are receiving OJS notifications
When to Call in a Professional
User and role management is straightforward, but some journals benefit from professional guidance:
- You are setting up an editorial team for the first time
- You want to ensure permissions are configured correctly for your workflow
- You have complex editorial structure (multiple sections, multiple editors) and want expert guidance
- You need help onboarding new editors or building your reviewer network
OJS Guru manages editorial team structure and user account setup, ensuring roles are assigned correctly and permissions match your editorial workflow.
👉 Get a free consultation at ojsguru.com
Frequently Asked Questions
How do I add a section editor in OJS?
Go to Users & Roles → Users → Create User, complete username, name, monitored email, and temporary password, check Section Editor, assign the journal section(s) they manage, optionally mark Can Review and expertise keywords, then Save and send welcome login details.
How do I add a reviewer to my OJS journal?
Create (or edit) a user under Users & Roles, enable the Reviewer role, ensure Can Review is checked, add specific reviewer keywords, set a realistic concurrent-review capacity for your notes, Save, and confirm they receive OJS mail when invited.
What is the difference between Journal Manager and Section Editor?
Journal Manager can create users and change journal-wide settings. Section Editors handle submissions in assigned sections: invite reviewers, track deadlines, and recommend decisions. They do not replace Journal Manager for site configuration.
Why can a reviewer not accept a review invitation?
Usually the Reviewer role or Can Review flag is missing, the account/email is wrong, invitation mail is blocked (SMTP issues), or they log in with a different username. Fix role + email, re-send the invite after testing login.
Can one person be both section editor and reviewer?
Yes—many journals enable Section Editor and allow Can Review. Keep Editor-in-Chief vs section duties clear; avoid stacking vague dual roles that blur who owns decisions.
How do I remove a departing editor without losing history?
Edit the user and uncheck their role (or set inactive) rather than deleting the account, so past assignments and audit trails remain. Hand open submissions to another editor first.
Summary
Building an effective editorial team in OJS requires understanding user roles, creating accounts correctly, and assigning appropriate permissions. The 9 steps covered in this guide take you from identifying team members through managing ongoing access:
- Access user management in OJS
- Create new user accounts
- Assign section editor roles with sections
- Assign reviewer roles with keywords
- Edit existing users and roles
- Set granular access permissions
- Communicate with new team members
- Monitor and manage your editorial team
- Remove or suspend access when needed
Done correctly, your editorial team will have appropriate access to their responsibilities, reviewers can accept invitations, section editors can manage their sections, and everyone can focus on their role without confusion or permission issues.
If you want expert help setting up your OJS editorial team, contact OJS Guru at ojsguru.com. We structure editorial teams and configure roles for journals of all sizes.
OJS Guru is a professional Open Journal Systems service provider specializing in OJS installation, customization, migration, and technical support for research journal publishers in 20+ countries. Visit ojsguru.com to request a free consultation.
